Thursday, November 15, 2012

Fenders & Wheels


California law states that 3 wheeled vehicles must have covering for each wheel. The wheels we had been using were just an old spare set C had lying around, but he had some rims he never used he donated to the project. The wider the wheels the more stable the ride, and the boys wanted to make sure I was safe. However, the new rims were 10” wide and 15” tall. We were going to need some big fenders. VW bug fenders were out because they would require too many points to mount to the frame. Motorcycle fenders that size are hard to find and ridiculously expensive. Instead we used a local vendor and got trailer fenders.


I took the rims C was donating and had tires mounted on them. Traditional bugs use 165/80-15 tires. These new tires were 275/60-15. You can see the size difference in the picture.


You can see how fierce the new tire looks on the frame


Of course, the first step was to get a layer of primer on the fender since we live near the coast and it is autumn.


Next C welded some solid 5/8 rod to the underside for the points that would attach to the frame


I trimmed the fenders with tape and sprayed the underside with undercoating to protect from road debris and dampen down the noise a bit. Then we did a mock up of the mounting for the tires.


C tack welded the fenders on and then we removed the hoop that mounted them to the frame so he could weld the underside. With the fenders off you can see the undercoating on them. That is why they are black.


Finally with all 3 fenders mounted the visual idea of the trike is actually starting to become a reality.


Of course, with it being autumn, and me having a day job, a lot of our work ends up happening at night.

Wednesday, October 10, 2012

The seats

The dilemma with the seats is that I did not want traditional motorcycle seats. As a disabled rider with neck problems I needed something that would support my upper body more than just a seat pan or a motorcycle seat with four inch back support. When checking around at custom seats it would have easily cost at least $2000 each for seats that would fit my need. That was no money in the budget for that. Instead I spent some time researching Do-It-Yourself motorcycle seats. In particular DIYMotorcycleSeat.com had much of the useful information that I needed.

We started with an 11 gauge piece of sheet metal. C used a tool called a Metal Nibbler to cut out the metal into the pattern of a seat pan. For those of you who are wondering how we made the template to trace onto the sheet metal I literally sat on a piece of cardboard and traced my butt.
When it was cut out and edges smoothed we had the base of the seat.
The next step was to heat the metal and bend the pan for what would become the rear of the seat. Of course, after we padded it I'm not sure how necessary this step was but this is how you make a traditional motorcycle seat so for our first attempt this is what we did.
Now we had the basis for a traditional motorcycle seat pan and needed to address the backrest. This time I leaned up against a piece of dry wall and marked the height I wanted the backrest. The goal was for the backrest to be similar in shape to a traditional U-shaped sissy bar only we were going to cover it with padding. We decided it should be 9 inches wide at the bottom and 4 inches wide at the top. I marked and cut out the dry wall to build a template.
From the template C was able to take some 5/8 inch thick steel rod, heat it with the blow torch, and bend it into the shape we needed.
Once he had it the shape and size of the template he welded it to the underside of the seat pan and then bent it to the angle we wanted for the seats.
Now that we had the basic shape of the seat structure we needed to put hardware on it so the seat could be mounted to the frame. Here's a picture of me using the drill press to put holes in 1 inch rod.
Of course, after spending a huge chunk of time getting the 1 inch rod cut to size, drilled, and then cut at a 45 degree angle we decided not to use it, but that is all part of the fun of building something without instructions.

Instead we used some 3/8" rod for the mounting screws and got traditional motorcycle seat brackets for the front.

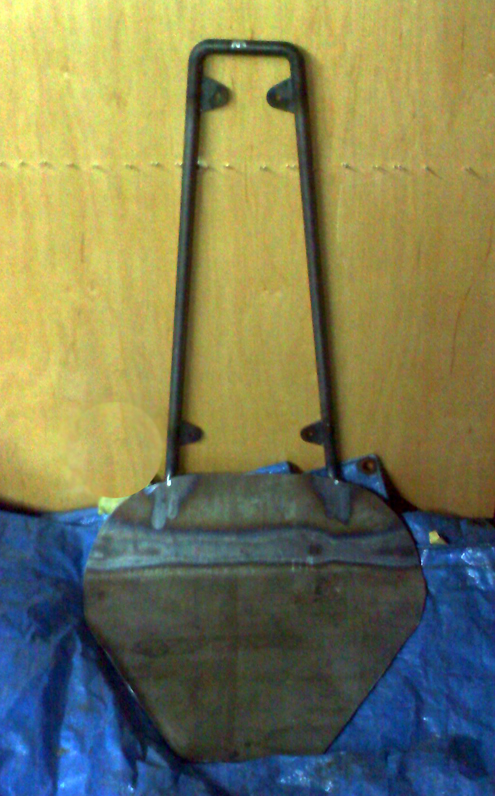
 Here is a picture of the basic structure.


Next C welded on little metal tabs to the back piece so we could mount a wood support for the middle.


The final structure with wood is ready to be upholstered.
Since I did my research I knew that most people who are building their own motorcycle seat will by some foam and vinyl then glue it to the seat. However, these seats were going to have full back rests we needed a something more breathable than vinyl. I decided leather was going to have to be the material used. I consulted my leather-smith artist Severn Lang about leather types and quality in addition to doing research myself. Despite having access to the vast material resources of the fashion district in Los Angeles I ended up finding a better deal online. I did not want typical black seats. This trike is going to be different. I am going with a grey/silver and blue color scheme. Finding grey or silver leather is trickier. However, through the magic of the world wide web I found Wholesale Upholstery and got what I needed for 1/3 the price that I would have locally.
For the foam I got two types. There is a firmer layer of foam that is designed to take the impact which is similar to what they use in gym mats. I bought a partial sheet of this kind of foam with 1 inch thickness. On top of that I got a high quality luxury foam to make the cushion soft but still maintain its loft. I began my search from reviews of other bloggers and ended up getting my foam from Foam Factory  However, I did not take a picture of it because I left it in the box to take to the upholsterer.

On the DIY website it talks about just buying specialized glue that will hold leather or vinyl to the metal seat pan. However, I knew with the back piece this build was going to be different. I talked with people who do upholstery as a hobby and looked at online referrals. I decided to go with Batz Auto Upholstery to do the work for me. I took in the two metal frames with wood back support, the box of two types of foam, and the leather pelt. After one week and a great deal on price I got the finished product back.


The seats are beautiful and comfortable. The downside is once we added the three inches of foam to the seat pan and only one inch to the top of the seat back now the backrest does not go up as high as I would like. However, they are supportive and Severn says we can make an extra cushion for my neck. More on that when we get it.

Now with the seats ready we can move forward on the rest of the project. It was only once we had the seats that we would be able to position the handlebars and the foot pedals.

Here is a picture of the trike with a mock up of where the first seat will go.

Here's me posing in front of my project.

And of course what the frame looks like with the mock up for both seats.
The metal bar behind the second seat is not mounted yet but that is one of the next steps. C is going to weld metal tabs to the bent bar so we can mount the structure that will support the seats onto existing parts of the frame. This way it can be removed and changed without becoming a permanent part of the frame structure. However, that is another blog for another day.

Thursday, August 9, 2012

Three Wheels and a Motor

Once we had the transmission in, the axles on, and the brake system with shocks mounted the next step was to get her on the ground and put some wheels on.
So we moved her from the shop table to the floor and balanced the frame on jacks.
We grabbed some old tires that were laying around and put them on as a temporary system. The funny thing is these are Porsche rims which some people would think of as perfect.
However, they just happen to be the perfect size for now.
You may notice the tires bowing a little so they don't wear evenly on the tread. That is part of the bug design. Once we get the weight of the motor on they will even out.

So before we can put the motor in we need to put the front end on so the trike is supporting her own weight on all three wheels before we add anymore. In the background of the above picture you can see the wheel we are going to use for the front end. We just need to mount it on the front end and then put both of those on the frame. You may remember the mock up of the front end mounted from the earlier picture...
Getting the front end on was a bit more challenging than we predicted because the front end hardware did not come with a stop to prevent the turning radius from slamming into the gas tanks. An additional piece was used and welded into place and we were ready to go.

The trike with front end mounted is now 11 feet long.
The trike is as wide as a bug in the rear but not in the front. The turning radius is limited, particularly for left turns, so no U-turns on this beauty. However, there is a reverse gear on the VW motor so three point turns will be no problem.

On to the motor...

The original German VW manufacturer for classic Beetle parts went out of business years ago. These days if you want an old style VW motor you have to get one built in Mexico or Brazil if you want original VW parts and something new. Lots of places in the states make their own versions of bug parts for Bajas and whatnot, but original German parts are hard to come by. We chose a less expensive route. The boys had an old '74 Baja motor just laying around. It had been out in the elements for years, but the core was still good and the engine was not cracked.
It definitely had some vintage parts on it to piecemeal it together. When I took it to the mechanic for the rebuild he laughed at the age of the carburetor. It is that square double flap valve piece on top.

You can see a better angle from it here. The mechanic was from Germany and has been rebuilding VW motors for over 30 years so when he said he'd never seen something that old I knew it must be really old. 

On the rebuild he used a Bocar instead, which are also no longer made so if it goes I will have to go with something Brazilian or Chinese but he said the Bocar was far superior and the boys agreed we were lucky to get it.  It is so pretty and shiny. The tins are painted a flat black, as are other parts of the motor.


This is what is known as a turnkey motor with clutch. You can buy motors in three stages: short block (which is the part of the motor below the headgasket and above the oil pan), a long block (which is a short block with the cylinder heads, gaskets, valves, valve train, and camshaft), or a turnkey (which means all you have to do is bolt it down because it is completely assembled). Since Ry and I had spent time over winter and spring rebuilding his bug motor up from a short block I had the basic knowledge of the parts and mechanics. I also knew how many hours went into building it up stage by stage. Additionally, since they had all the parts laying around to build a complete turnkey that is what we had rebuilt.

With the turnkey completely assembled and the clutch already mounted and installed all we had to do was slide the motor into the transmission, and bolt it down in four places.

We got the hardware in place to make sure it was handy for the transfer.
It is not quite as easy as snapping Legos together, but it is way easier than putting in the axles by far.

Ta-da the two are now one. Due to the fact that in a normal bug there would be a car body between the two parts it is much harder to get all four bolts tightened down on a complete bug than on a trike.
This is what the back end of the trike looks like at this stage. We still need to do the electrical wiring. We need to figure out what we are going to do for seats and handlebars. Once we know where the seat for the driver (me) will be mounted then we can mount the pedals. This trike is going to have all foot controls (gas, brake, and clutch) like a bug, and not hand brakes or clutch like a motorcycle. To help us get a visual I put an old kitchen chair over the frame to start to imagine what it will be like...
You can't see the full front end but you can start to imagine what it is going to be like. Or you can even picture yourself here...
Of course the front view will be different once there are handlebars, but this gives you an idea. Next step, electrical or steering/handlebars. I'm voting electrical because it is lots of little parts. More as we have it.


Monday, May 21, 2012

brakes and shocks

Once the axles and axle tubes were in place and the transmission was mounted we were ready to move the trike closer to being a rolling chassis.
The next step was to put on the axle boot. I bought a newer modification which is a split boot. This allows one to put on the boot after the axle is in the transmission. In this picture the boot clamp has been twisted to allow you to see how the screws and nuts hold the two pieces of the boot together.
However, I loosened the clamp closest to the wheel to rotate the boot into a smooth position. That way when the vehicle is at rest there is no additional stress on the boot so it will last longer. In the picture below you can see the boot is straight. At this point the axle is mounted and bolted to the frame.
Next a series of bearings and gaskets are added so we can begin to mount the brake system.

In a previous post I mentioned we are converting the trike from a traditional bug drum brake system to a more modern disc brake system for extra safety.
With the brake mounts in place we can install the wheel mounts.
Here is a rear view of the trike with the wheel mounts on.
After the wheel mounts are in place we bolt on the disc braking system.
Finally, the shock absorbers are mounted after the brakes are on.

At this point we could put the tires on the hubs and mount the wheels on the frame, but since we are not ready to roll the frame we thought it would be easier to leave on the shop table without the tires in place.

Visually it is starting to look closer to complete. We still need to install a clutch and a motor. We need to get some seats and frame up some body shell to mount the seats upon. The front end is ready to install but we still need to get handle bar risers to mount on the front end and some handle bars. However, we have finally caught up with all the purchased parts and have completed installing everything I hoped to do by Easter.